

How to Add Custom Fonts to Anki
Anki can use a font file stored directly in your collection, so your cards can display a custom Chinese font without relying on that font being installed system-wide. This tutorial also creates a separate note type for the custom font, which helps keep your existing cards and note types unchanged.
View Anki's official custom-font instructions →Rename the font file for Anki
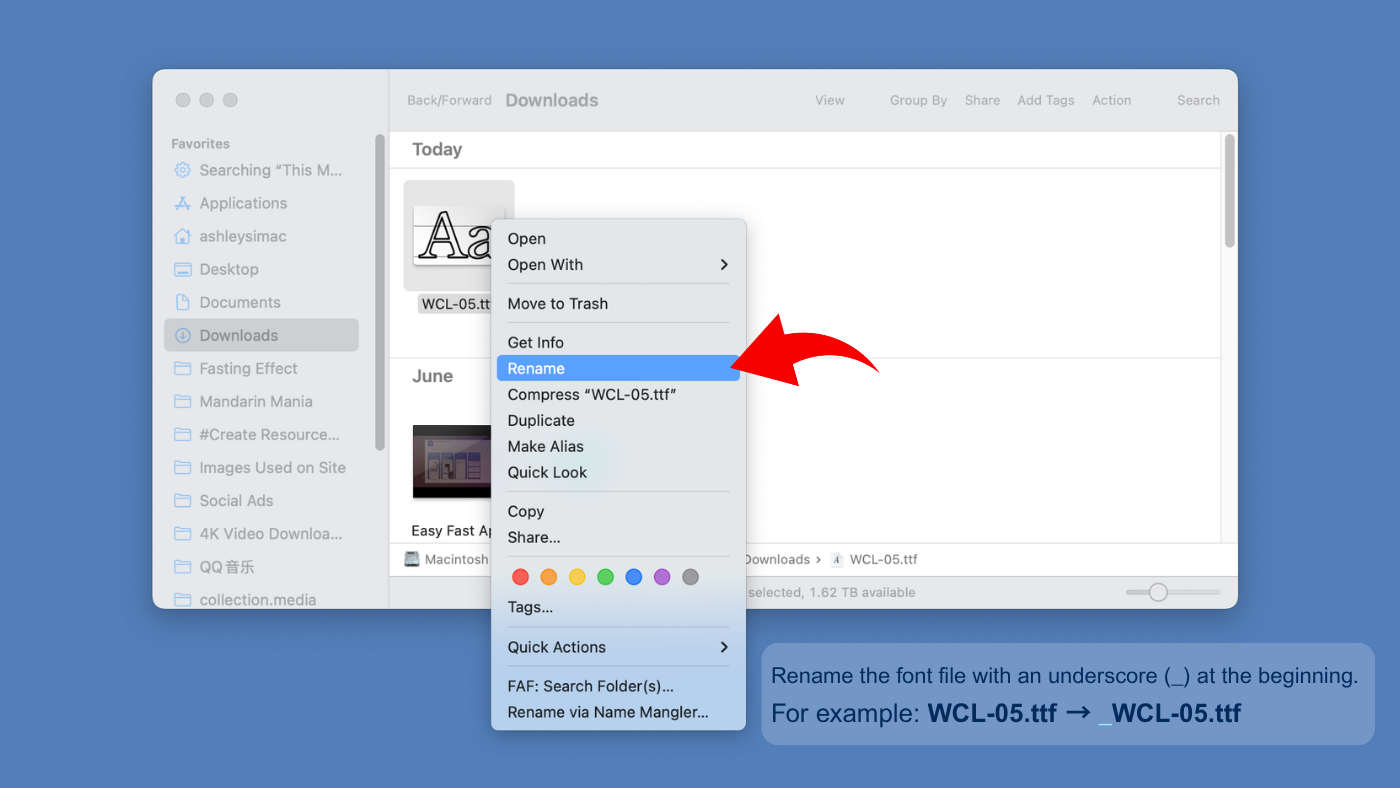
Open your Downloads folder, or the folder where you saved the font. Right-click the font file and choose Rename.
Add an underscore (_) to the very beginning of the filename. For example, WCL-05.ttf becomes _WCL-05.ttf. Keep the existing file extension exactly as it is.
Why the underscore? Anki uses it to recognize the font as a file referenced by a card template, so it will not be treated as unused media during media checks.
Move the font into collection.media
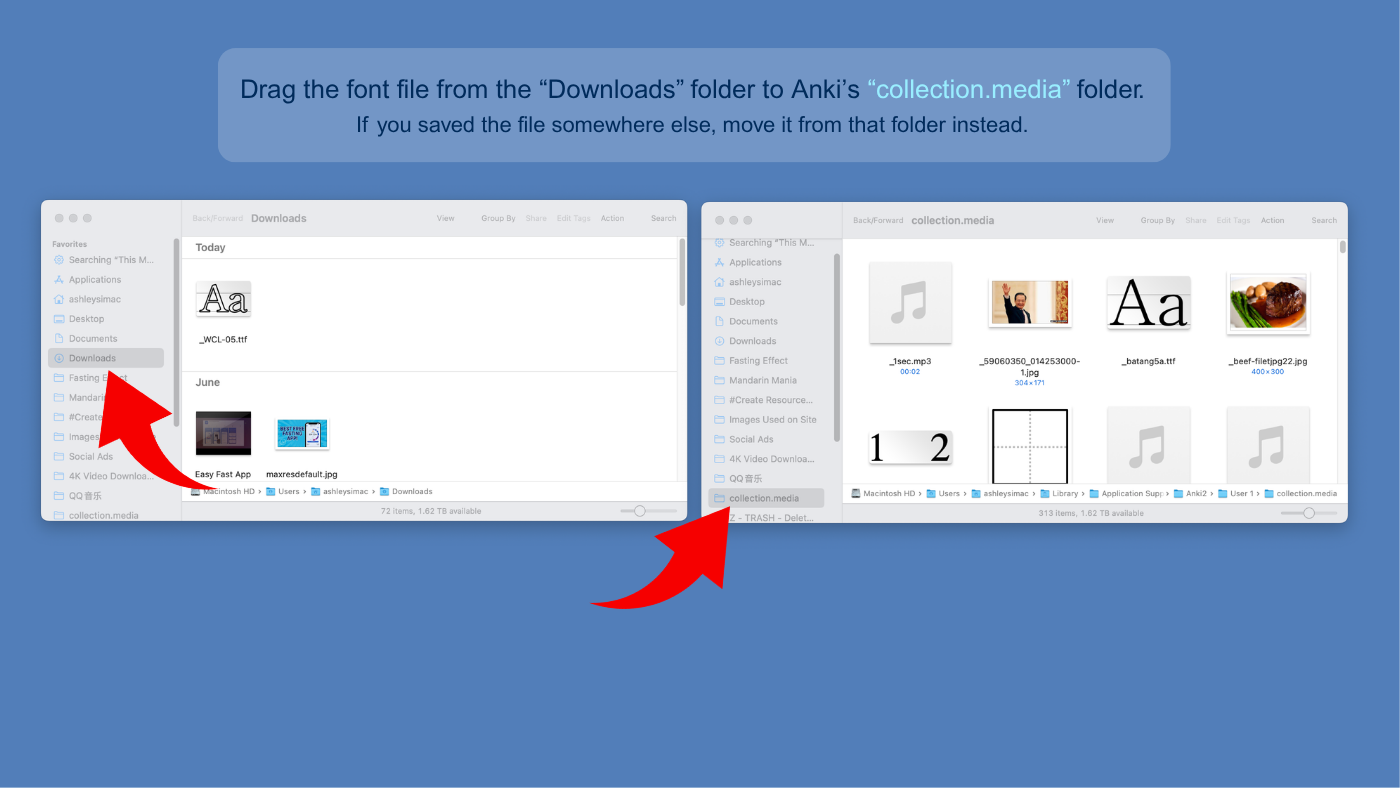
Open your Anki profile's collection.media folder. Drag the renamed font file from Downloads into collection.media. If you saved the font somewhere else, move it from that folder instead.
Can't find collection.media?
Mac: In Finder, open Go while holding Option, choose Library, then open Application Support/Anki2/your profile/collection.media.
Windows: Enter %APPDATA%\Anki2 in File Explorer's address bar, then open your profile folder and collection.media.
Linux: Recent Anki versions normally store profile data under ~/.local/share/Anki2.
Prefer a visual walkthrough? Watch this short video showing how to find your collection.media folder →
Anki keeps a separate collection.media folder inside each profile, so be sure you are using the profile that contains the cards you want to style. See Anki's official file-location guide →
Confirm the font is in the media folder
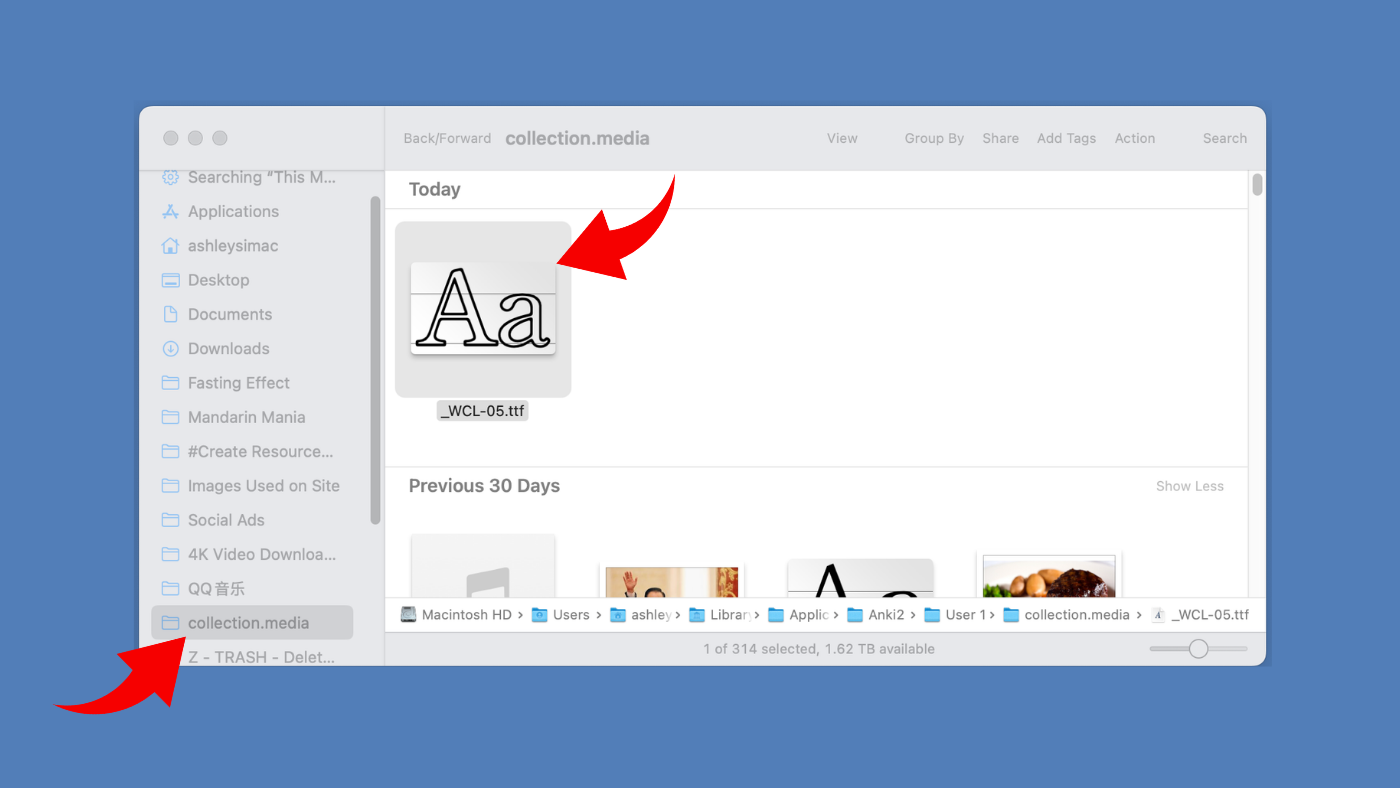
Check that the renamed font now appears inside collection.media. Make a note of the filename because you will need to enter it exactly in Anki later.
For this method, you do not need to install the font separately in Font Book or Windows Fonts. Anki will load the font from its media folder.
Open the Add window in Anki
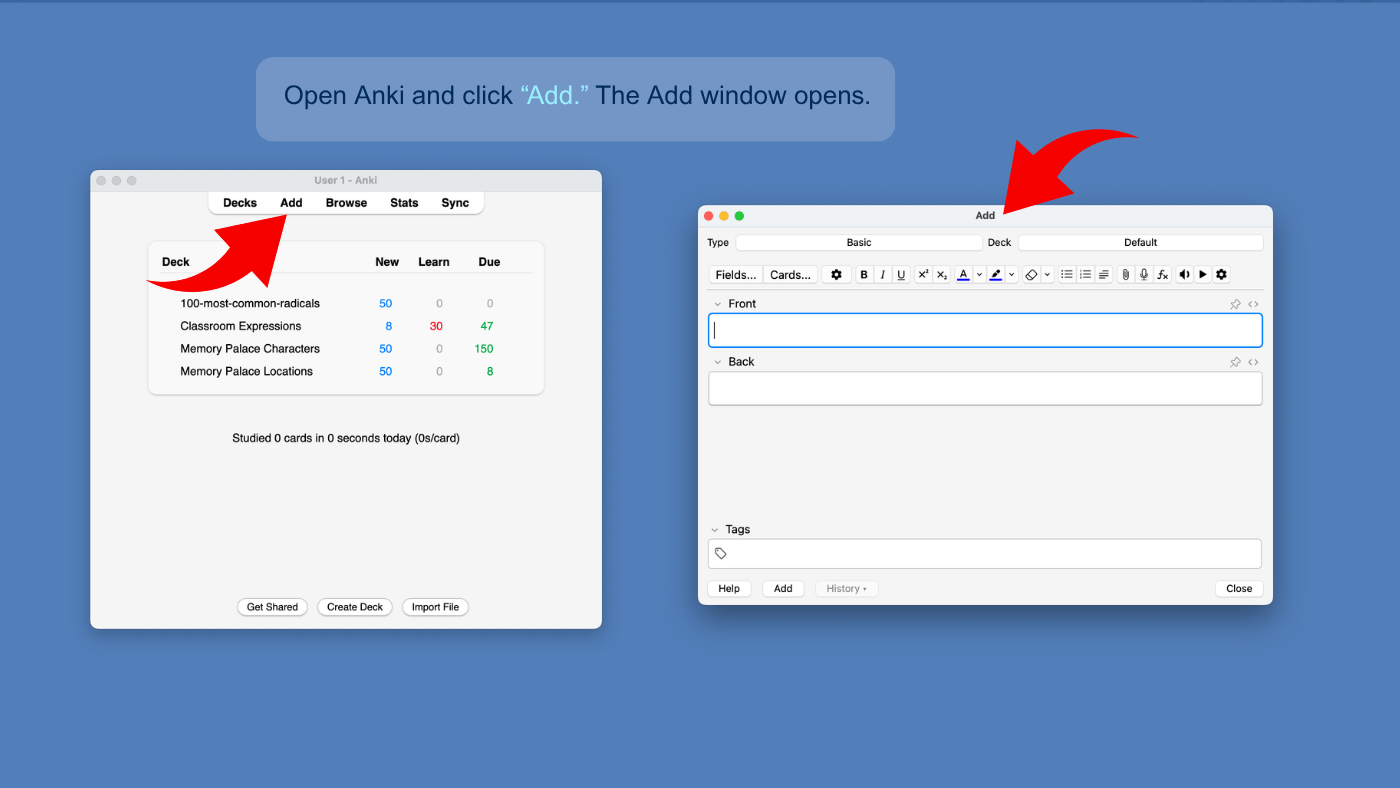
Open Anki and click Add at the top of the main window. The Add window will open.
You will use this window to create and select a note type that uses your custom font.
Open the note type selector
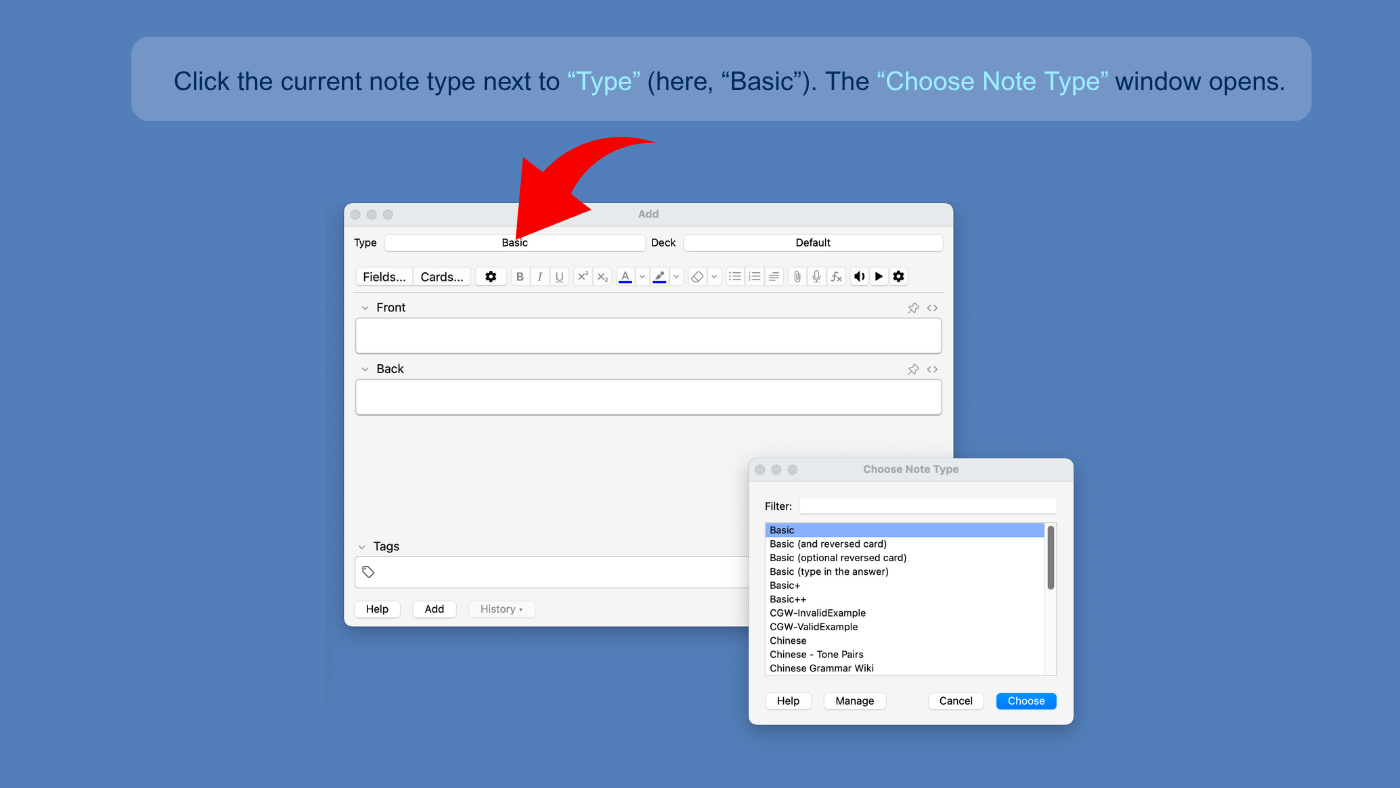
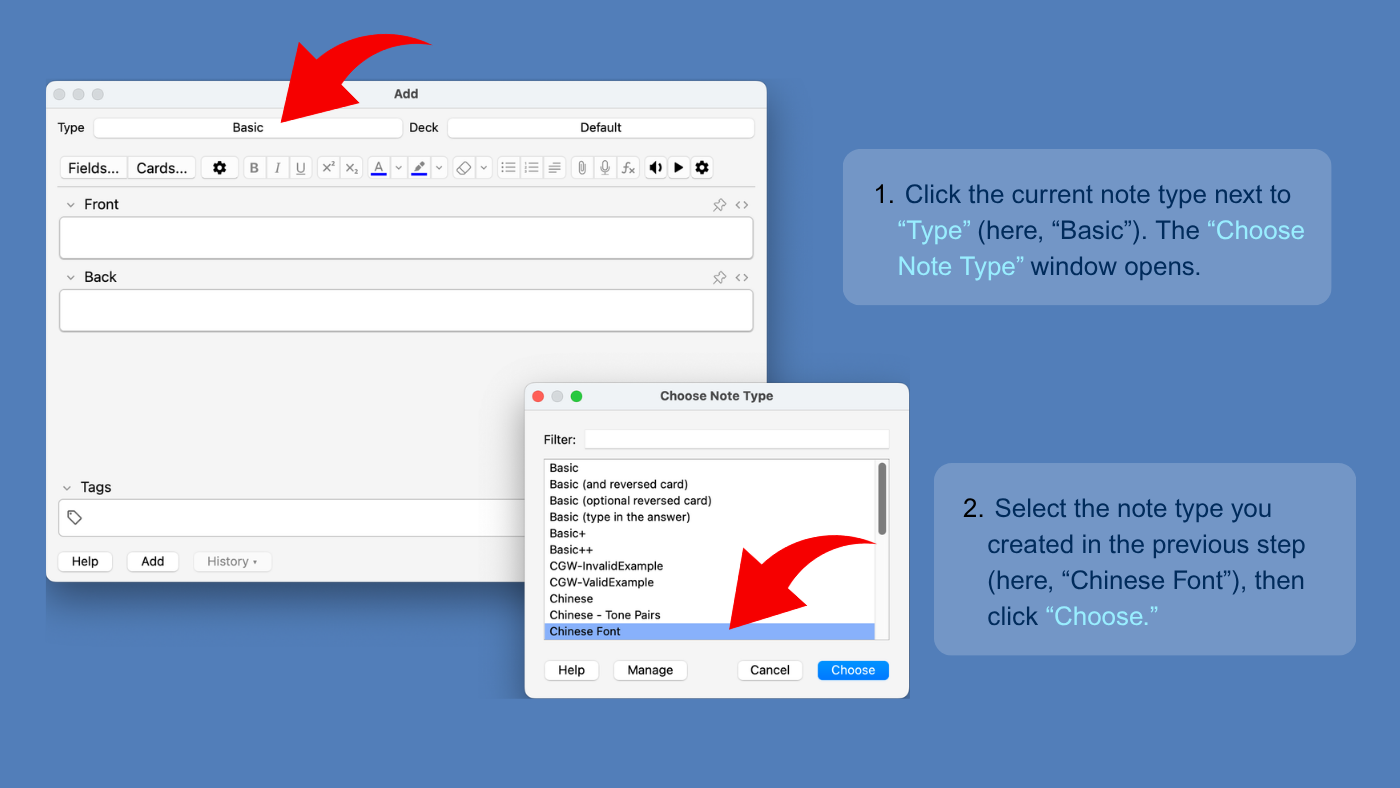
In the Add window, click the current note type next to Type. In the example, the current note type is Basic.
The Choose Note Type window will open.
Open Manage Note Types
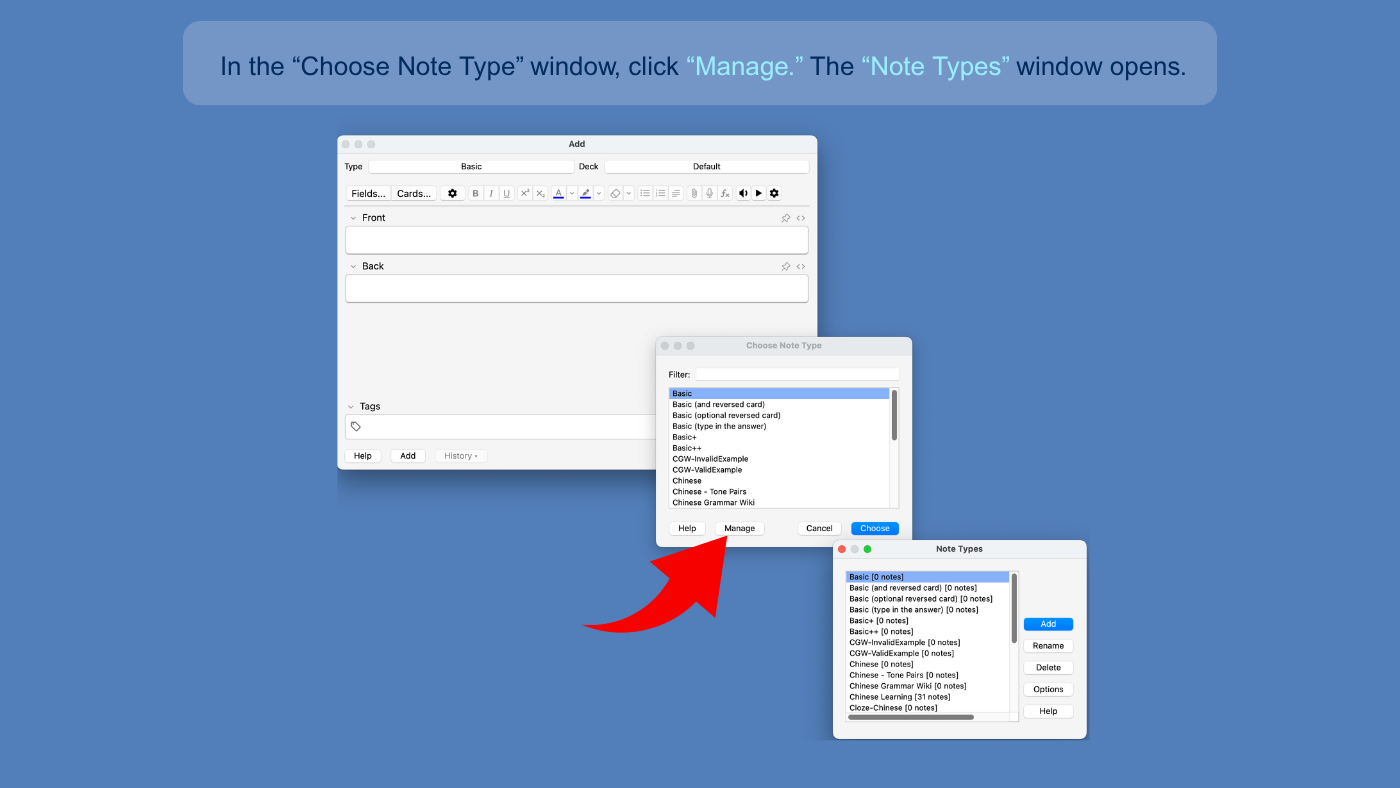
In the Choose Note Type window, click Manage. The Note Types window will open.
Why create a new note type? It gives you a separate version for the custom font instead of changing the styling of your existing Basic note type and every card that already uses it.
Create a new note type
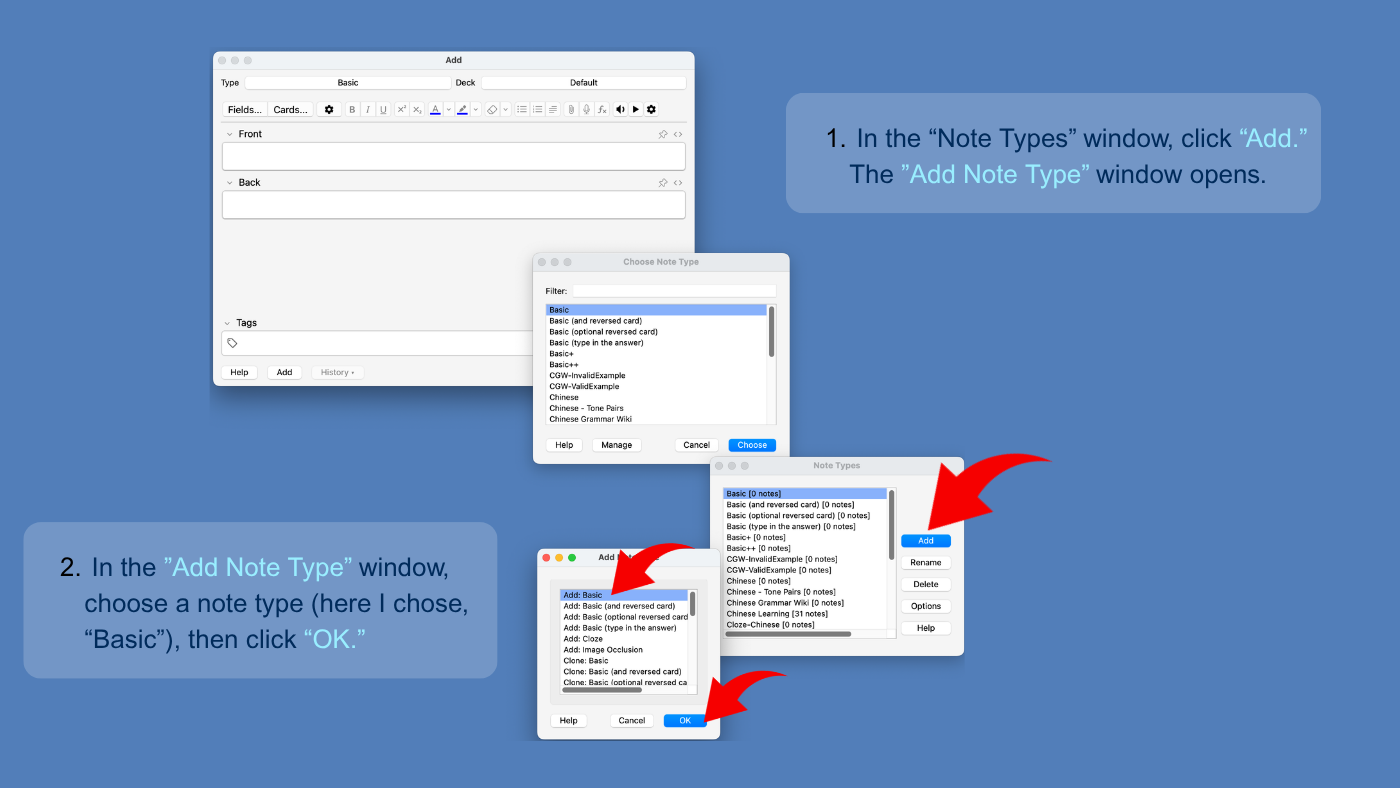
In the Note Types window, click Add.
In the Add Note Type window, choose the note type you want to use as the starting point, then click OK.
The example uses Basic, which is a simple choice for standard front-and-back cards. If you normally use a different note type, choose the one that matches the kind of cards you plan to create.
Name the new note type
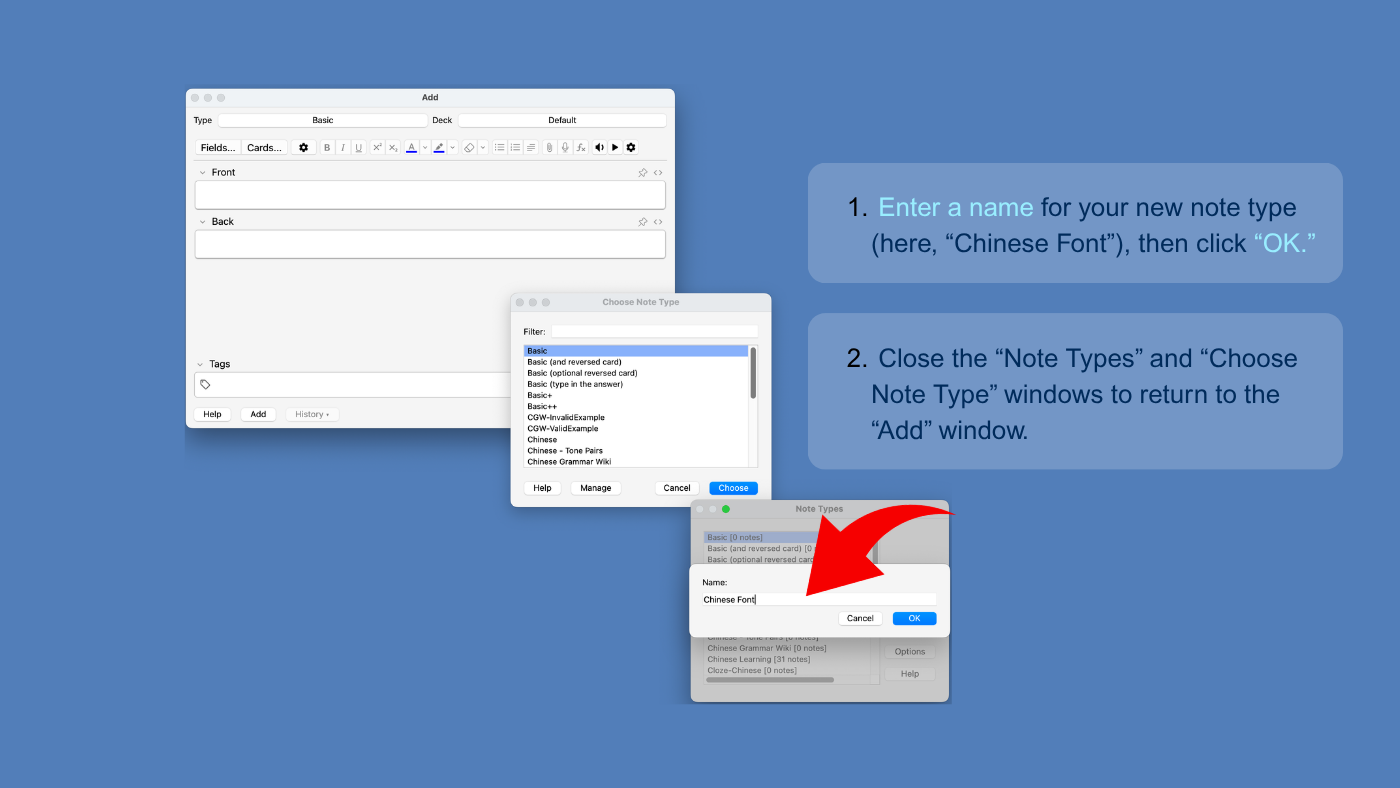
Enter a clear name for the new note type. In this example, it is called Chinese Font. Click OK to save it.
Then close the Note Types and Choose Note Type windows to return to the Add window.
Select your new note type
Back in the Add window, click the current note type next to Type again. When the Choose Note Type window opens, select the note type you just created and click Choose.
In the example, the new note type is Chinese Font.
Add the custom font to the card styling
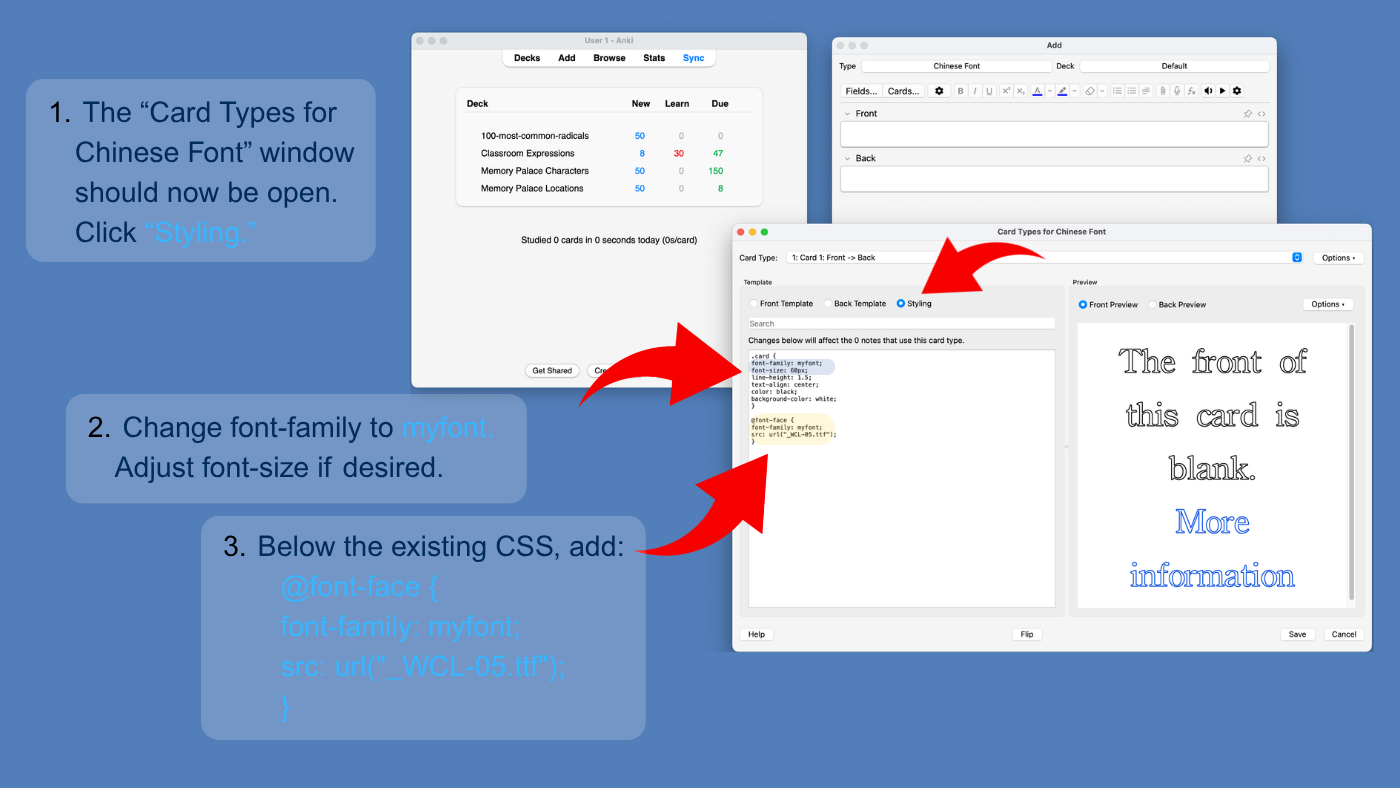
With your new note type selected in the Add window, click Cards... to open the Card Types window. Then click Styling.
In the existing .card section, find the font-family: line and change its value to myfont. For example, change font-family: arial; to font-family: myfont;. You can also change the font-size value if you want larger or smaller text.
Next, go to the bottom of the existing styling code, after the final closing brace, and paste the code from the Custom font CSS box shown beside the instructions.
Important: The filename in url("...") must match the real file exactly, including the underscore, capitalization, punctuation, and file extension.
@font-face {
  font-family: myfont;
  src: url("_YOUR-FONT-FILE.ttf");
}
Replace _YOUR-FONT-FILE.ttf with the exact filename in your collection.media folder. If your file is _WCL-05.ttf, use that exact name. If your font uses another supported extension, such as .otf, keep that extension instead.
Check that the new font is working
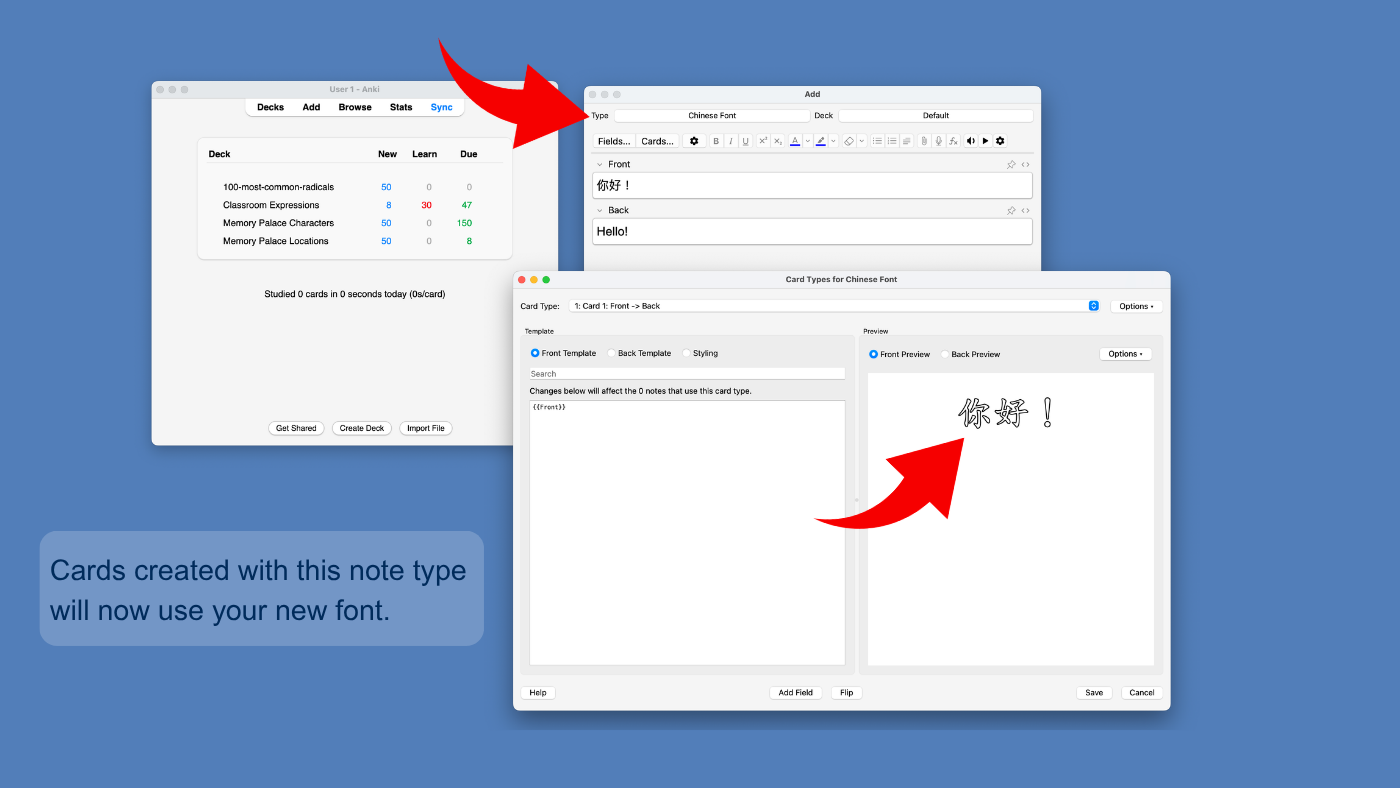
The preview in the Card Types window should now display text in your custom font. Cards created with this note type will use the same styling.
Close the Card Types window when you are finished. You can now add cards with your custom-font note type selected.
If the font does not appear
- Make sure the font file is inside the collection.media folder for the Anki profile you are actually using.
-
Check that the filename begins with an underscore, such as
_MyFont.ttf. - Make sure the filename in the CSS matches the real filename exactly, including uppercase and lowercase letters and the extension.
-
Confirm that the
.cardsection saysfont-family: myfont;and that the@font-faceblock is below the existing CSS.